
This homemade vanilla ice cream recipe is simple and delicious! With only 3 main ingredients, no eggs, and no churning, you couldn't ask for a better summer treat!

Add in the food coloring to make this ice cream extra fun and dip your waffle cones in chocolate for that extra something! Oh and don't forget the sprinkles- I love sprinkles!
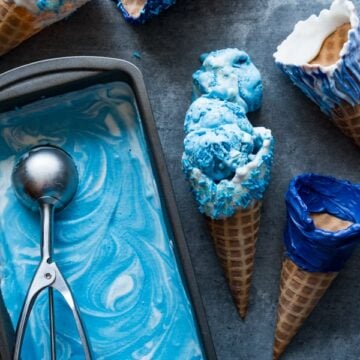
Homemade Vanilla Ice Cream Recipe, easy and delicious!

How to make no churn vanilla ice cream
- Place the container you are going to freeze the ice cream in, in your freezer to get it nice and cold!
- Whisk together heavy cream and vanilla extracts until stiff peaks form! Here is where you'd add other extracts as well if you wanted to. Using a stand mixer or hand held mixer will make this task much easier.
- Once you have stiff peaks (2-5 minutes), using a rubber spatula, fold in the sweetened condensed milk.
- If adding food coloring, divide mixture in half and fold in food coloring to one half.
- Alternating between colors, add spoonfuls (I like to use a ¼ cup) to your dish that has been in the freezer. Then swirl the mixture with a knife.
- Cover and freeze for at least 5 hours.
- Dip your waffle cones in chocolate, decorate, fill with ice cream and enjoy!

How to make ice cream cone stands:
- Using a cardboard box (the one your cones came in works nicely) and a sharp knife, cut Xs in the box several inches apart. My box could only fit 6.
- Then place your cone, pointy end first, into the X and it should stand up! This is great for getting the chocolate on the cones to dry without laying them down!
Save this for later!
Don't worry, I promise not to spam you!

Homemade Ice Cream Vanilla Flavored perfect for summer!

If you enjoyed this recipe, check out Mini Apple Pies, No Knead Bread, Homemade Caramel Sauce, Cinnamon Roll French Toast Bake, and my Homemade Limeade!

BE SURE TO FOLLOW ME ON FACEBOOK, INSTAGRAM, PINTEREST & TWITTER!
No Churn Homemade Vanilla Ice Cream Recipe
Ingredients
- 2 cups heavy cream
- 14 oz sweetened condensed milk
- 1 teaspoon vanilla extract*
- Blue food coloring
- Waffle Cones
- 1 cup White Candy Melts
- 1 cup Blue Candy Melts
- Sprinkles
Instructions
For the ice cream
- Place metal or freezer safe glass loaf dish in the freezer.
- In a medium sized bowl (you can use a stand mixer), using a whisk or the whisk attachments for your mixer, whisk the heavy cream and vanilla. Continue whipping until stiff peaks forms, about 2-5 minutes.
- Using a rubber spatula, fold in the sweetened condensed milk.
- Separate mixture into two bowls. Add blue food coloring to one.
- Remove the loaf pan from the freezer and add in the white and blue ice cream mixture. I like to alternate adding each ¼ cup at a time to get a good color layering system going.
- Take a knife and drag it through your mixture a few times, swirling it about, then cover with plastic wrap and freeze for 5-6 hours.
For the dipped cones
- Make your ice cream cone stand! See instructions in the post above!
- Melt the white and blue candy melts in their own microwave safe bowls. I like to microwave the chocolate for 30 seconds, stir and then repeat until the chocolate is melted.
- Dip your Waffle Cone in the white chocolate, then using in a fork scoop some blue melted chocolate and swirl it into the white. Alternatively you can just add sprinkles to the white chocolate or do any combos of chocolate and sprinkles as you like!
- Fill with ice cream and enjoy!
Notes
Nutrition
This recipe was originally part of my full Hearthstone Menu and related to the Cone of Cold Card.


Lisa says
Love how easy and delicious this is!