

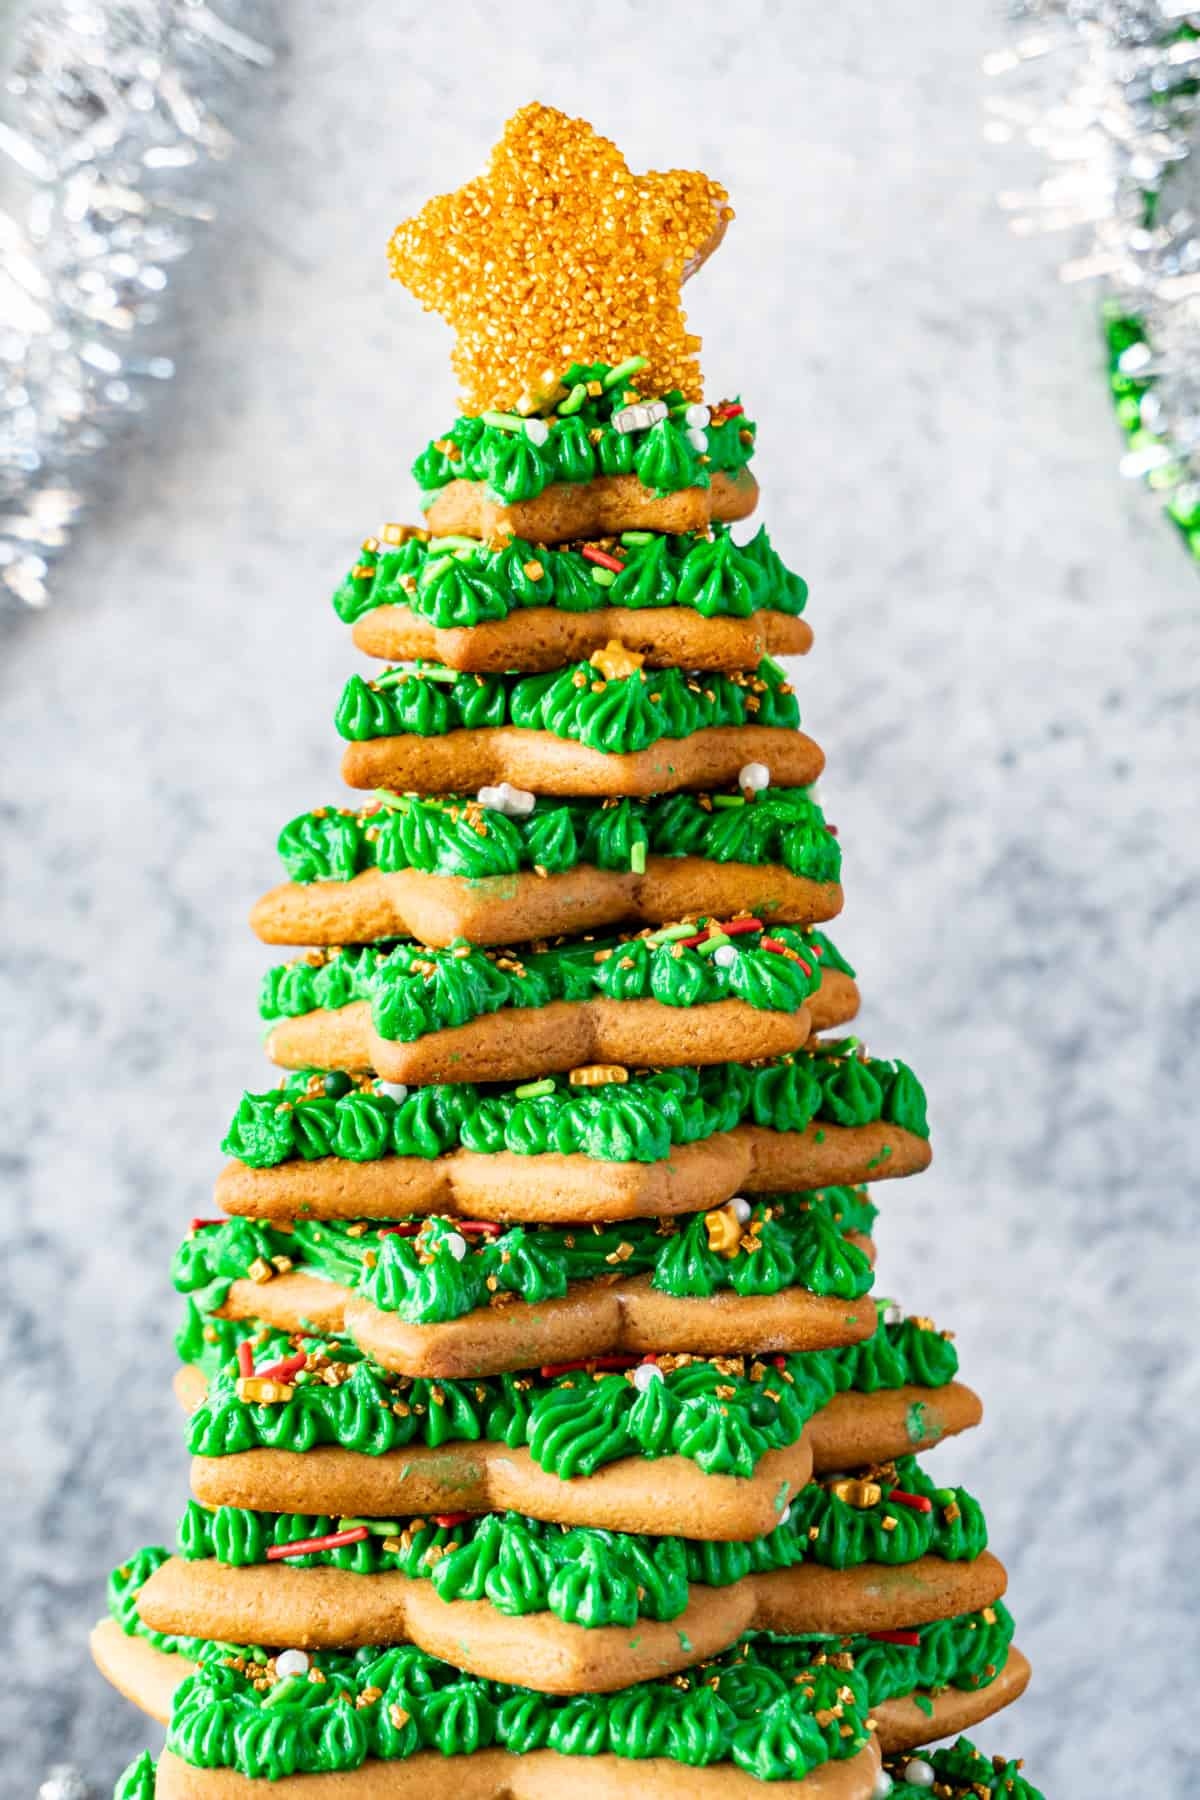
This Gingerbread Christmas Tree is a show-stopping holiday dessert that's as fun to make as it is to eat! With spiced gingerbread cookies stacked high and decorated with sweet buttercream icing, it's the perfect edible centerpiece for your Christmas table.

Jump to:
When I first saw this cookie-cutter set, I thought initially I wanted to make a sugar cookie tree, but I realized the dark gingerbread color with a beautiful green was what I really wanted.
Using my favorite gingerbread cookie recipe, I set out to create this beautiful display that tastes good, too!
Why This Recipe Works
- Fun & Festive: Build a tree-shaped dessert that doubles as holiday décor!
- Deliciously Spiced: Warm flavors of ginger, cinnamon, and molasses bring cozy Christmas vibes.
- Customizable: Decorate with icing, sprinkles, or powdered sugar for your own festive touch. Also, make it as tall or short as you like!
- Make Ahead Friendly: The cookies can be baked and decorated in advance for easy assembly.
What This Recipe Needs
- Cookie Star Cutter Kit: This is a must to get the right cookie proportions!
- Flour: The base that gives structure and crispness to your cookies.
- Butter & Brown Sugar: Add rich flavor and a perfect chewy texture.
- Molasses: Deepens the color and infuses that signature gingerbread taste.
- Ginger, Cinnamon, Cloves, Nutmeg: Create that warm, classic Christmas flavor.
- Egg: Helps bind the dough, making it easier to roll and cut.
- Buttercream Frosting: Used to "glue" the cookie stars together and decorate your tree.
- Green Food Gel Coloring: I love using a food gel to make vibrant colored frosting.
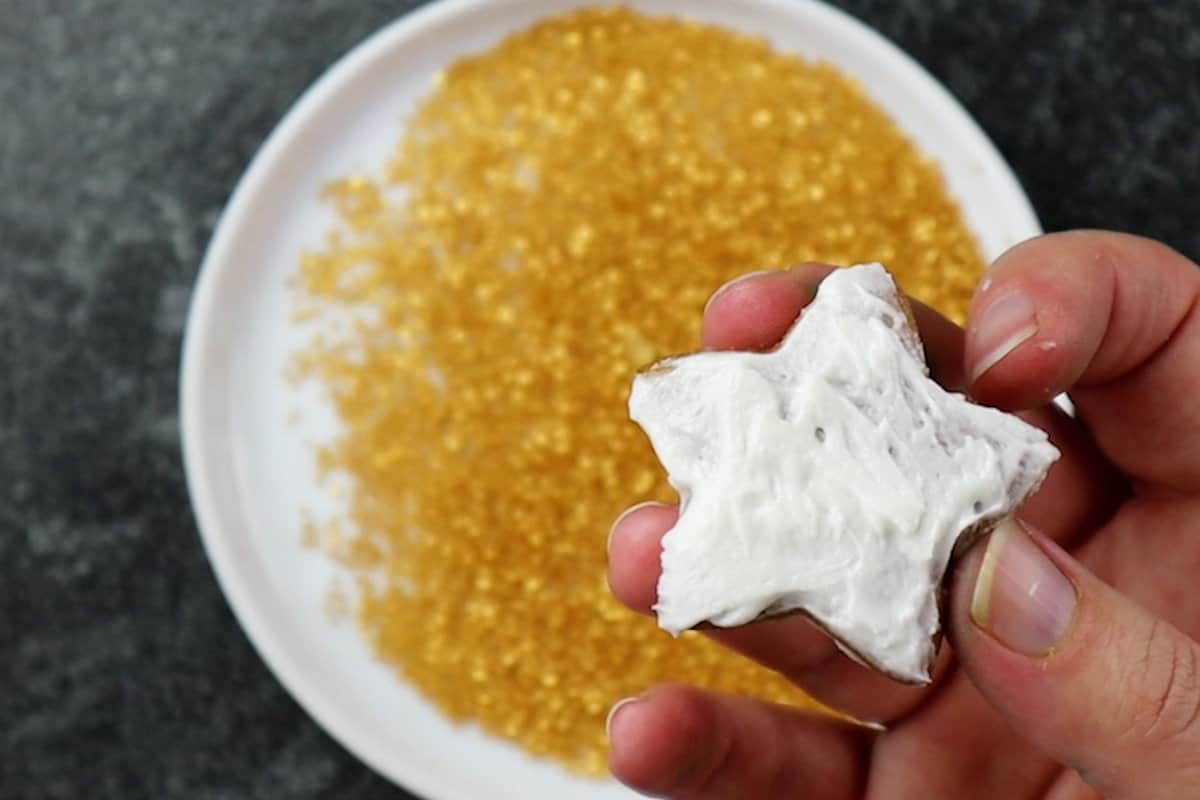
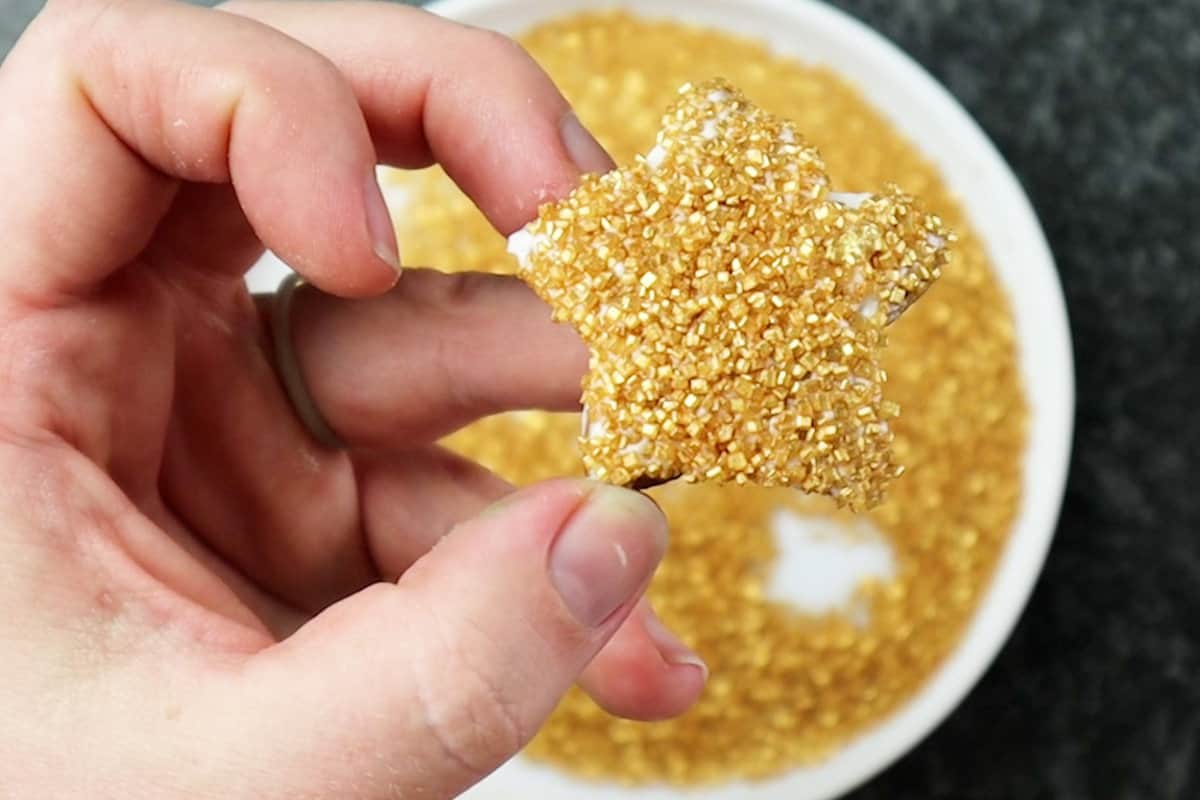
- Sprinkles: Add an extra festive touch by decorating your tree with pretty Christmas Sprinkles! I also used Gold Sanding Sugar to decorate the star topper for the tree.
- Additional Items: Piping Bag, Star Piping Tip, Parchment Paper, and a Rolling Pin.
Substitutions
- Molasses: Substitute with dark corn syrup or honey for a milder flavor.
- Buttercream: Use Royal Icing or a store-bought cookie icing for a quicker option.
- Spices: Adjust to taste-add more ginger for extra spice or less cloves for a softer flavor.
Want more delicious Gingerbread recipes? Check out my Gingerbread Crinkle Cookies, Gingerbread Bundt Cake, and this easy Gingerbread Trifle!
Gingerbread Christmas Tree Timeline
This recipe takes at least two days to make, but is best if you plan for three.
- Day 1: Make the dough and refrigerate it overnight.
- Day 2: Bake all the cookies and let them cool. Once cool, decorate each cookie and allow frosting to set completely.
- Day 3: Assemble and enjoy!
How to Make a Gingerbread Christmas Tree?
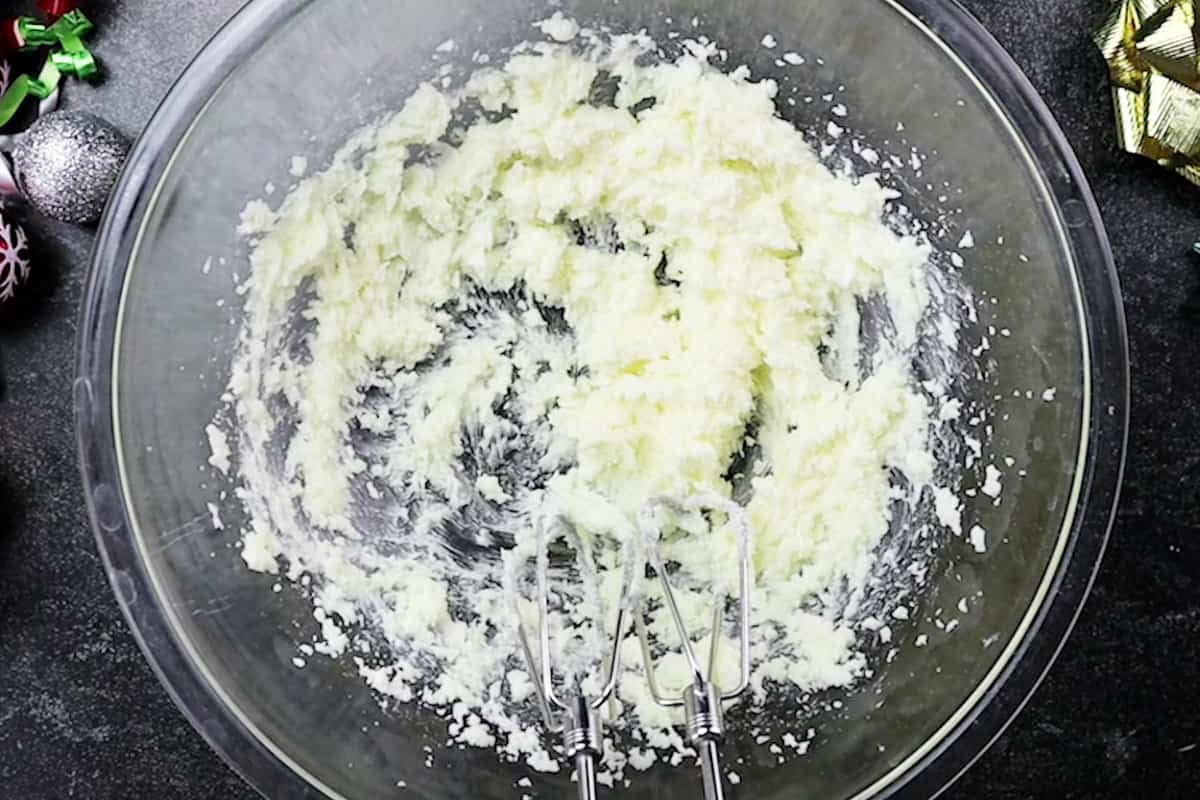
- Step 1: In a mixer, cream the butter and sugar.
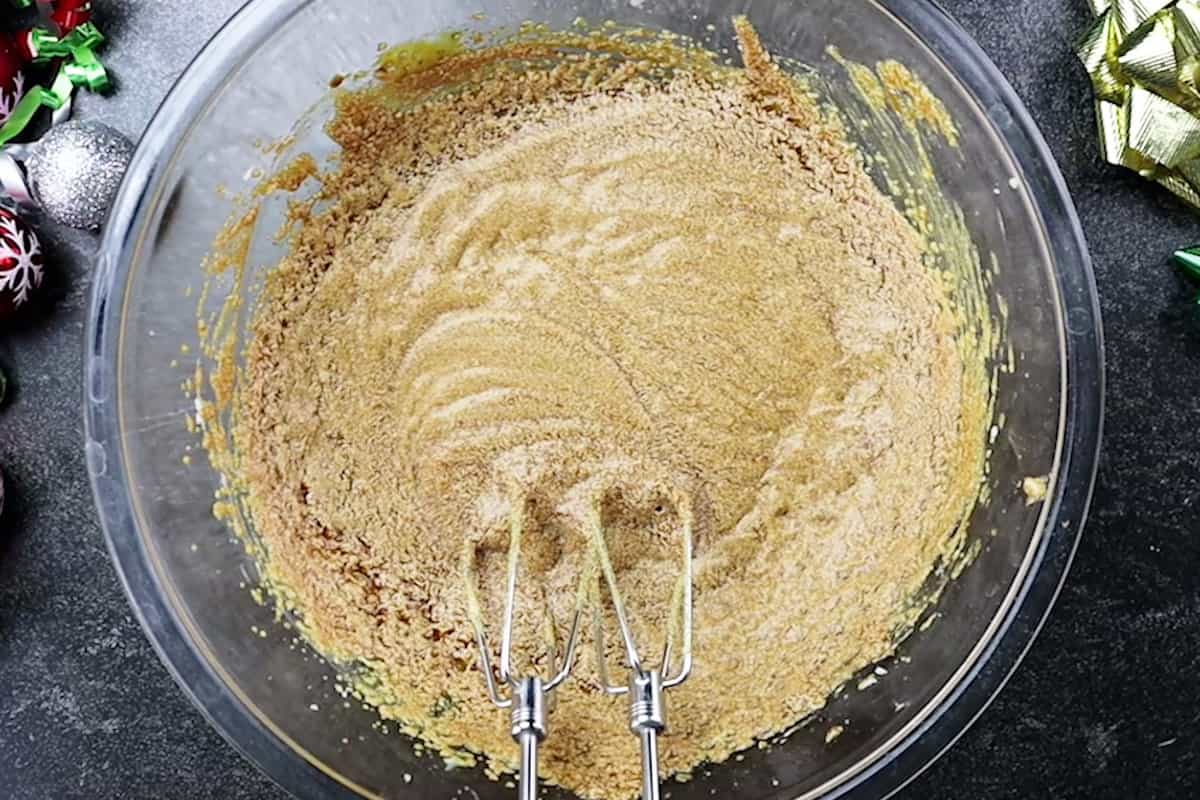
- Step 2: Then mix in the molasses and buttermilk.
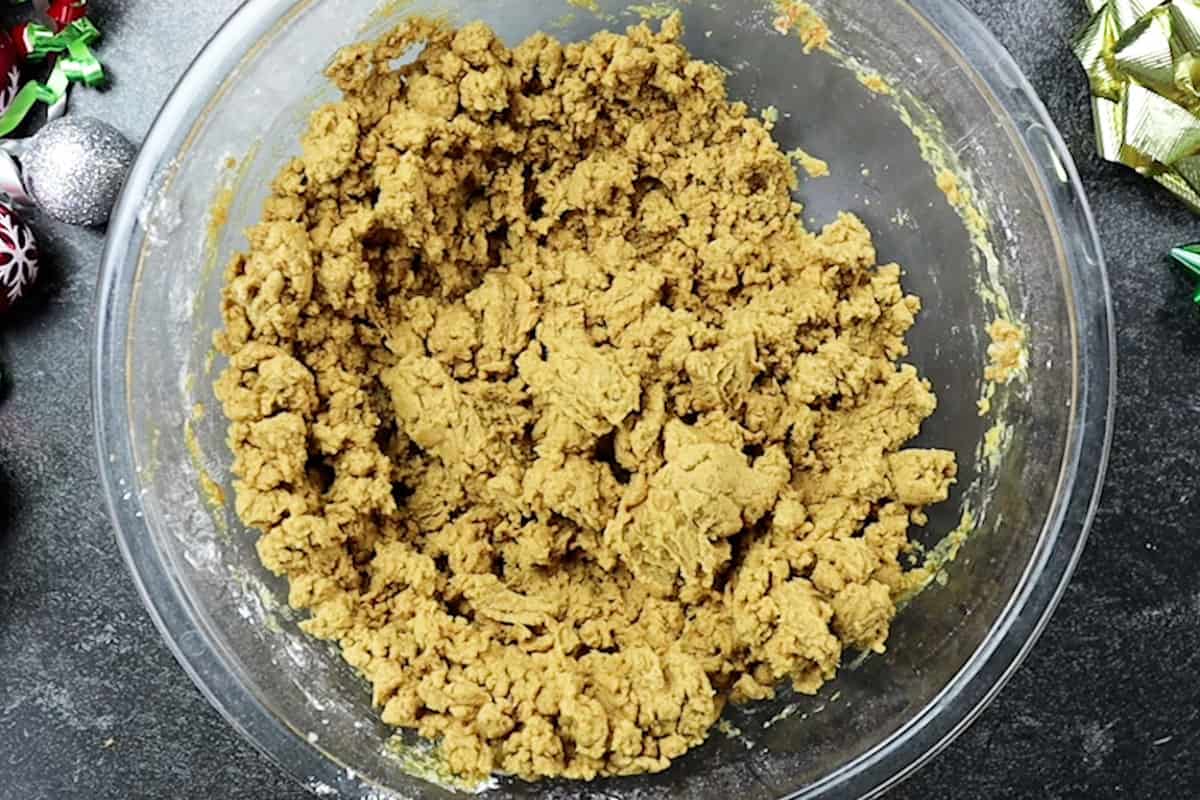
- Step 3: Add in the dry ingredients and mix until thoroughly combined.
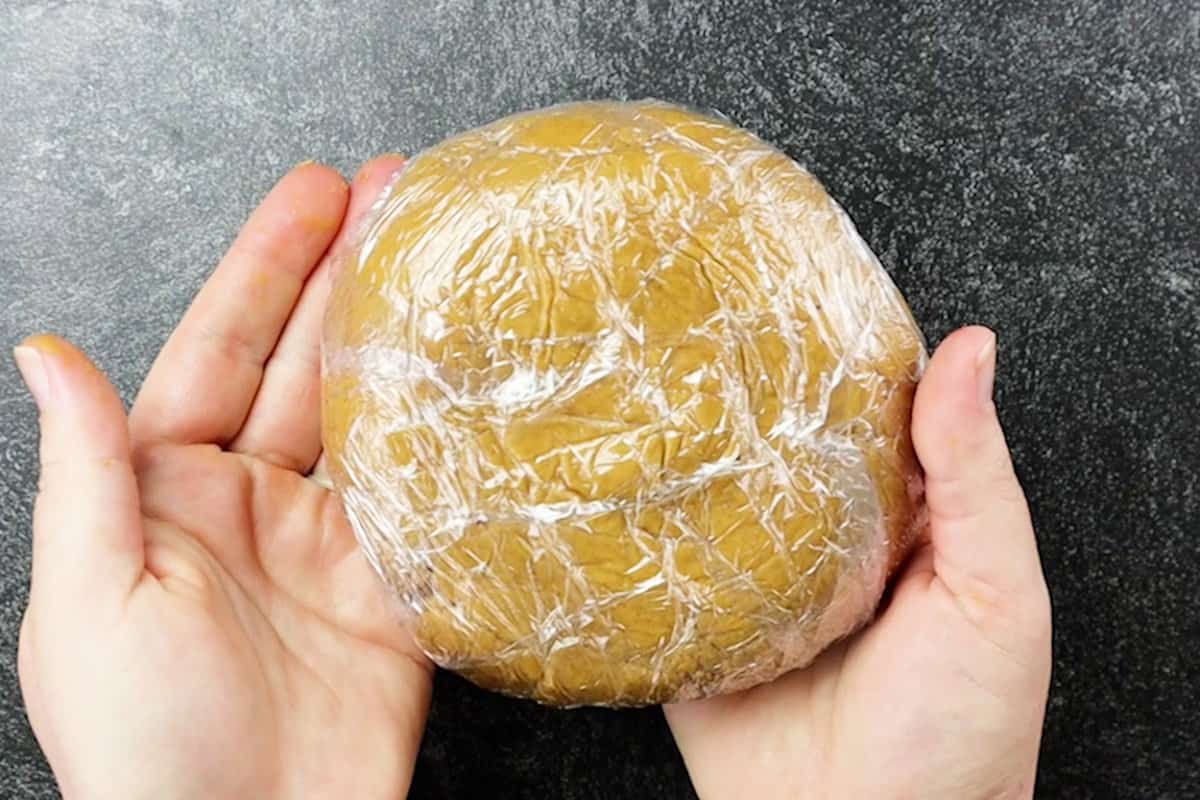
- Step 4: Divide the dough into three equal portions, wrap each portion in plastic wrap, shape into a disc, and refrigerate overnight.
Save this for later!
Don't worry, I promise not to spam you!

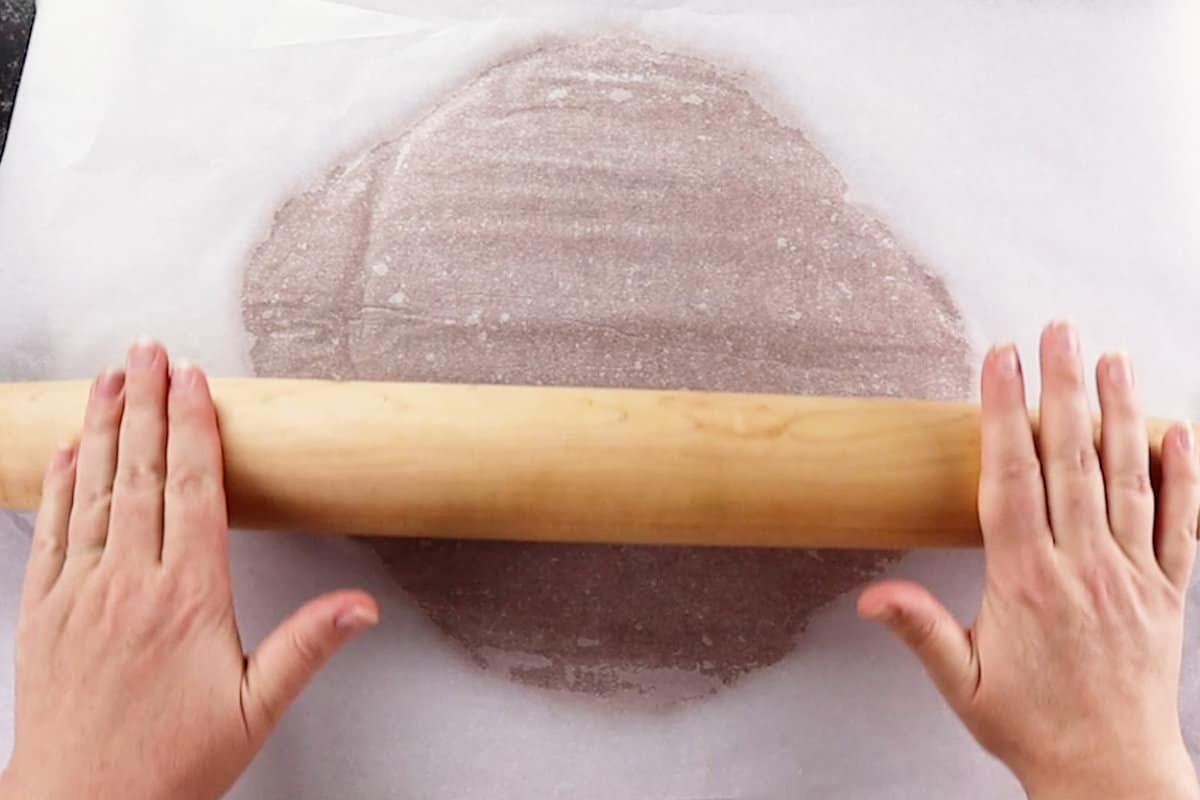
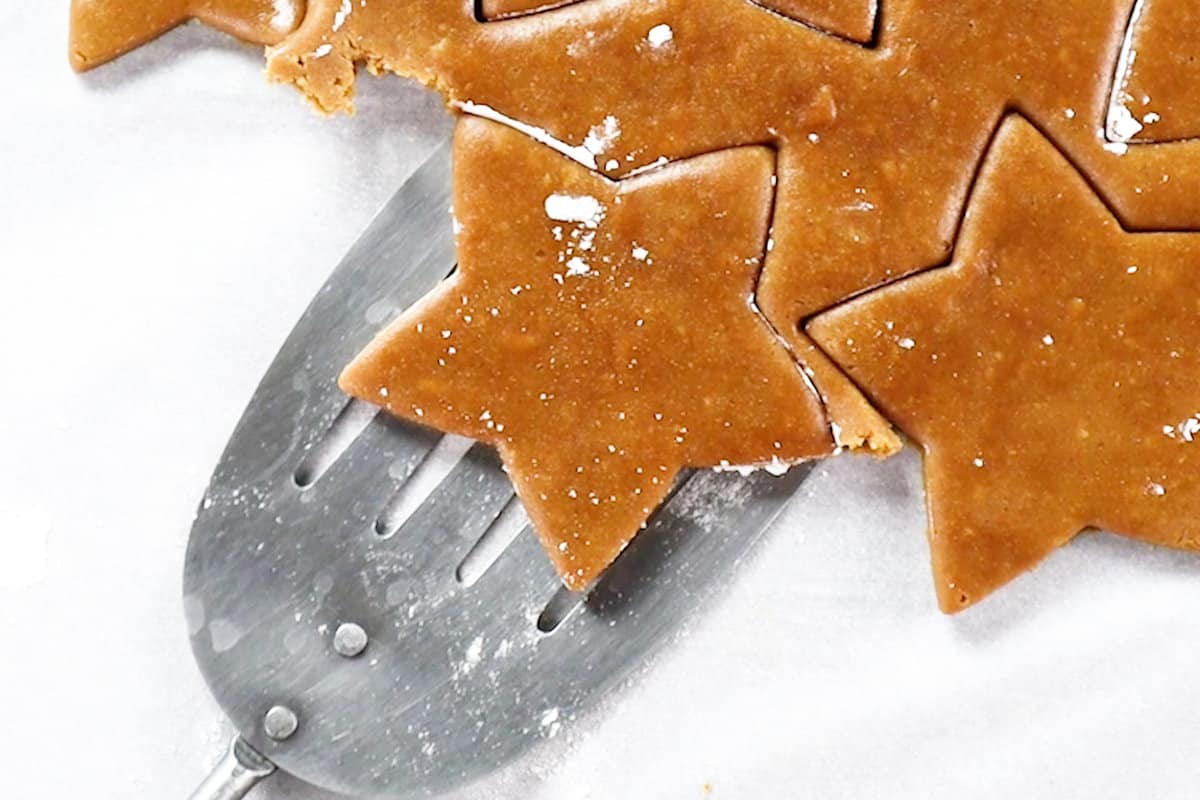
- Step 5: The next day, roll out the dough to ¼-inch thickness and cut out the stars.
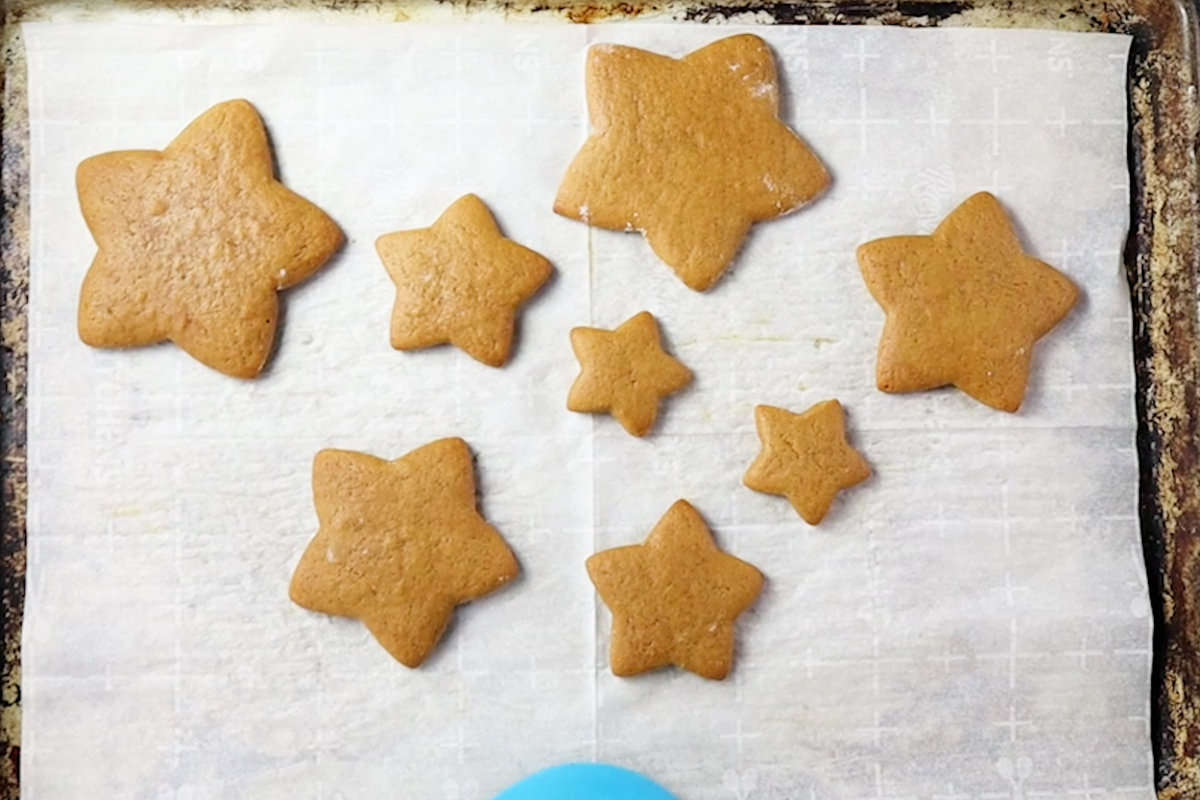
- Step 6: Bake, let cool, then decorate. Make sure to save a little frosting for the assembly day.
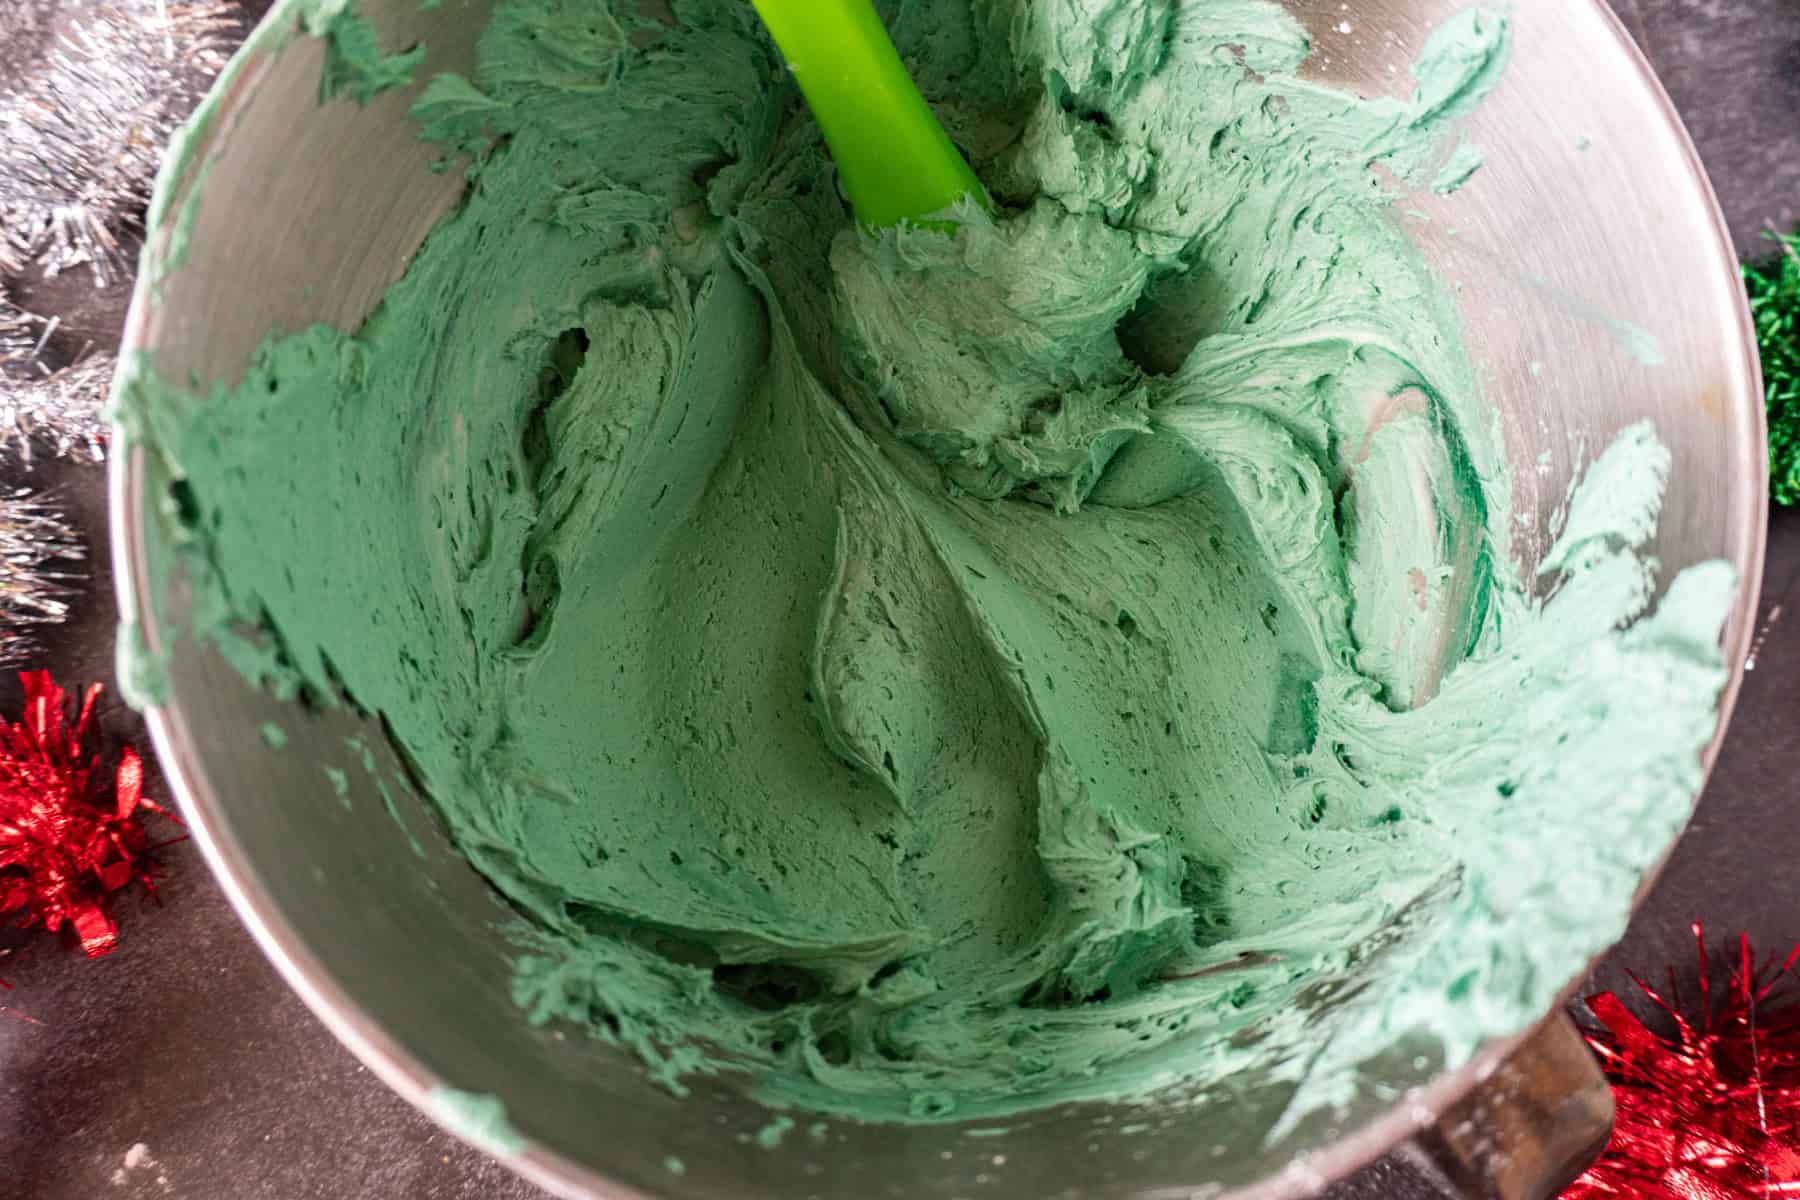
- Step 1: Mix up a big batch of green buttercream by creaming the butter, then mixing in the powdered sugar, heavy cream, vanilla, and salt. Add green food gel and mix thoroughly.
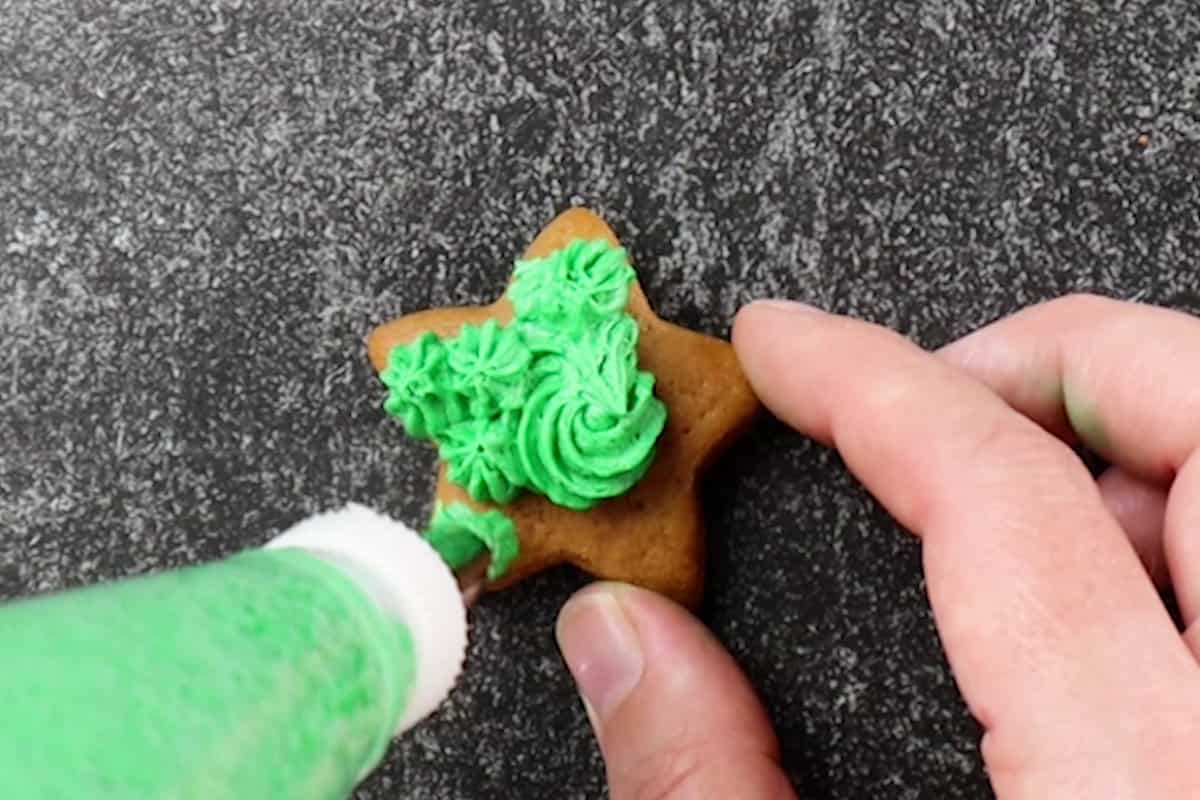
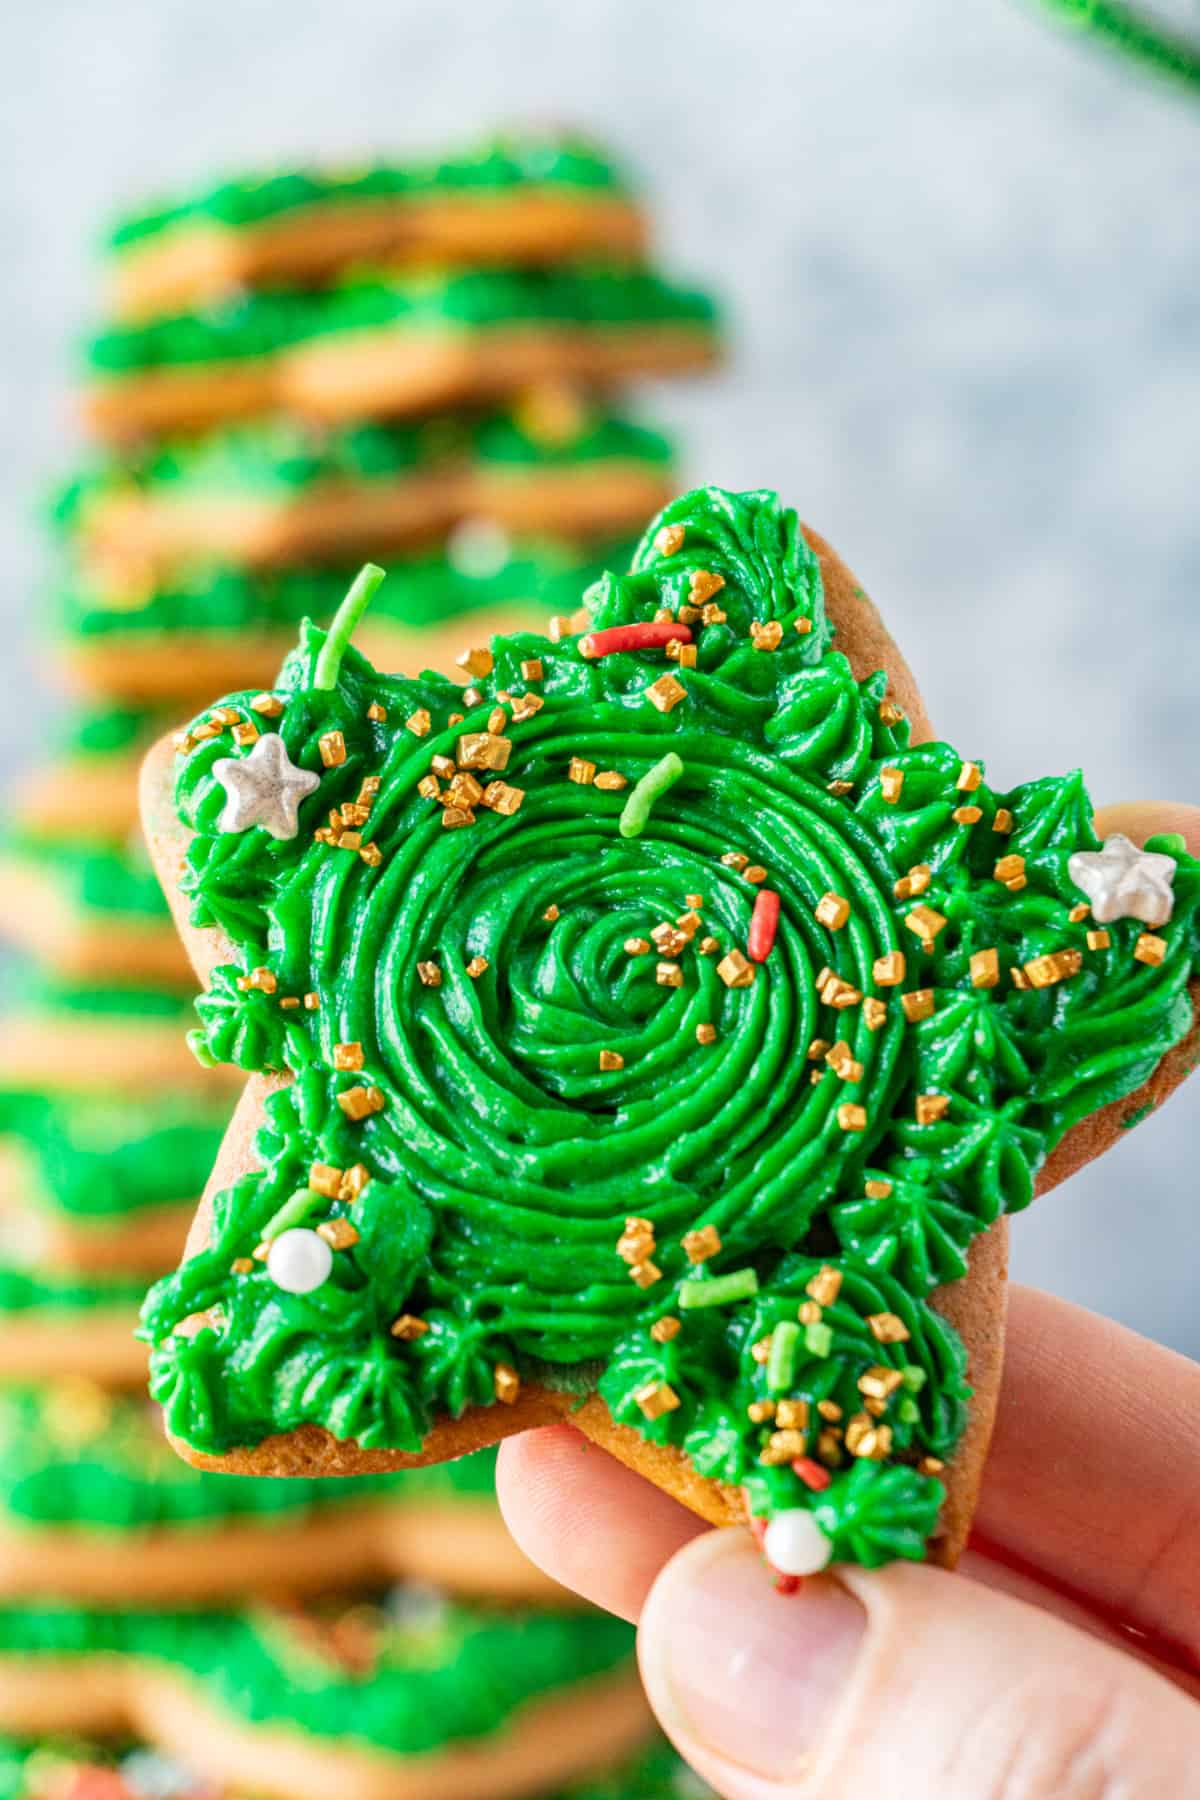
- Step 2: You can decorate the cookies however you like, using my butter cream frosting, royal icing, or anything else you choose. Just keep in mind that each cookie needs to be level since you will be stacking them.
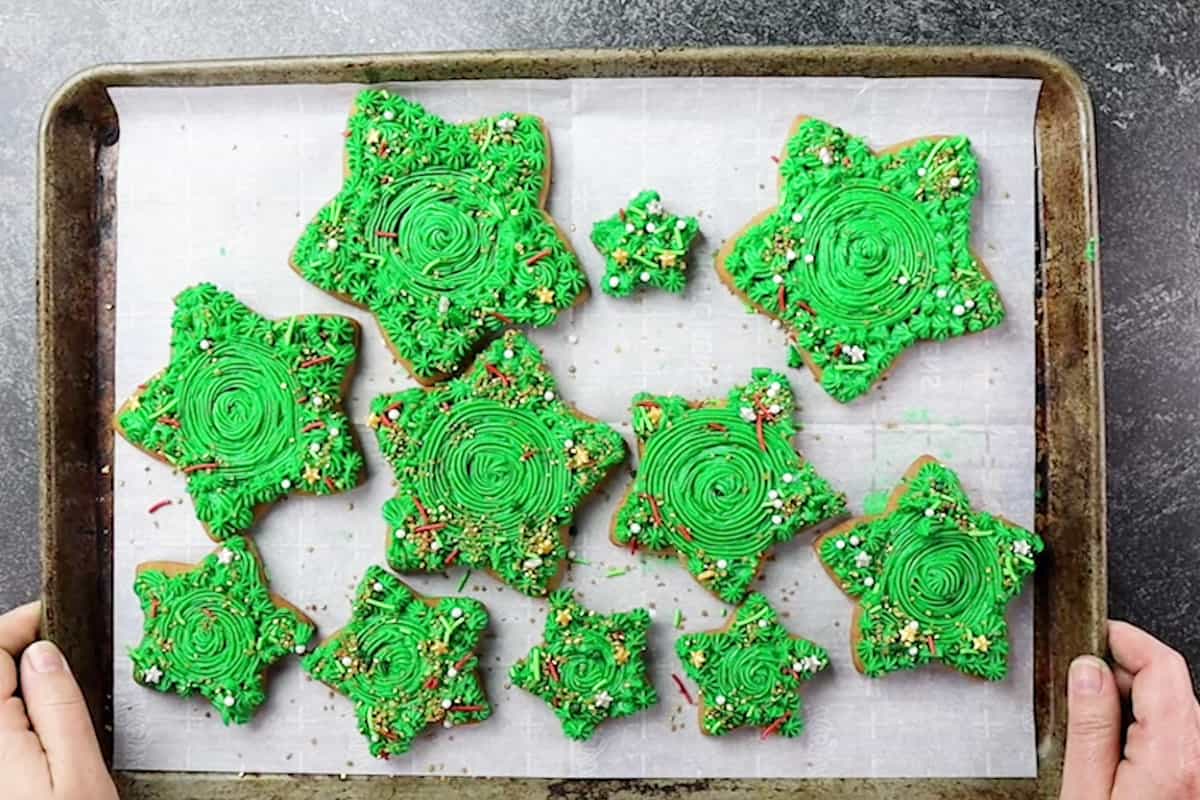
- Step 3: Refrigerate decorated cookies until frosting is set. Decorate one of the smallest stars with gold sanding sugar as the tree star topper.
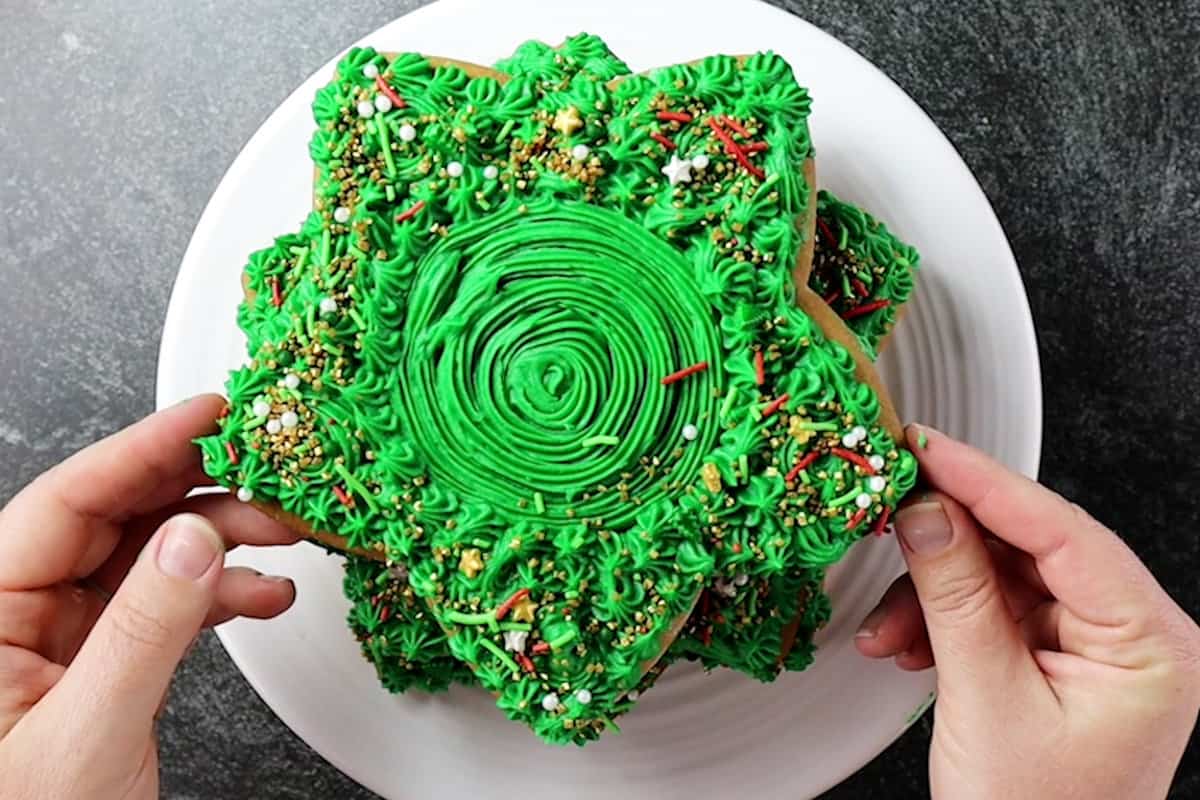
- Step 4: To assemble, add a dollop of frosting to the stand you want to build the tree on. Then place one of the two biggest stars on top of the frosting to stick it to the plate. Stack the stars in descending size (largest on the bottom, to the smallest on top), alternating the points.
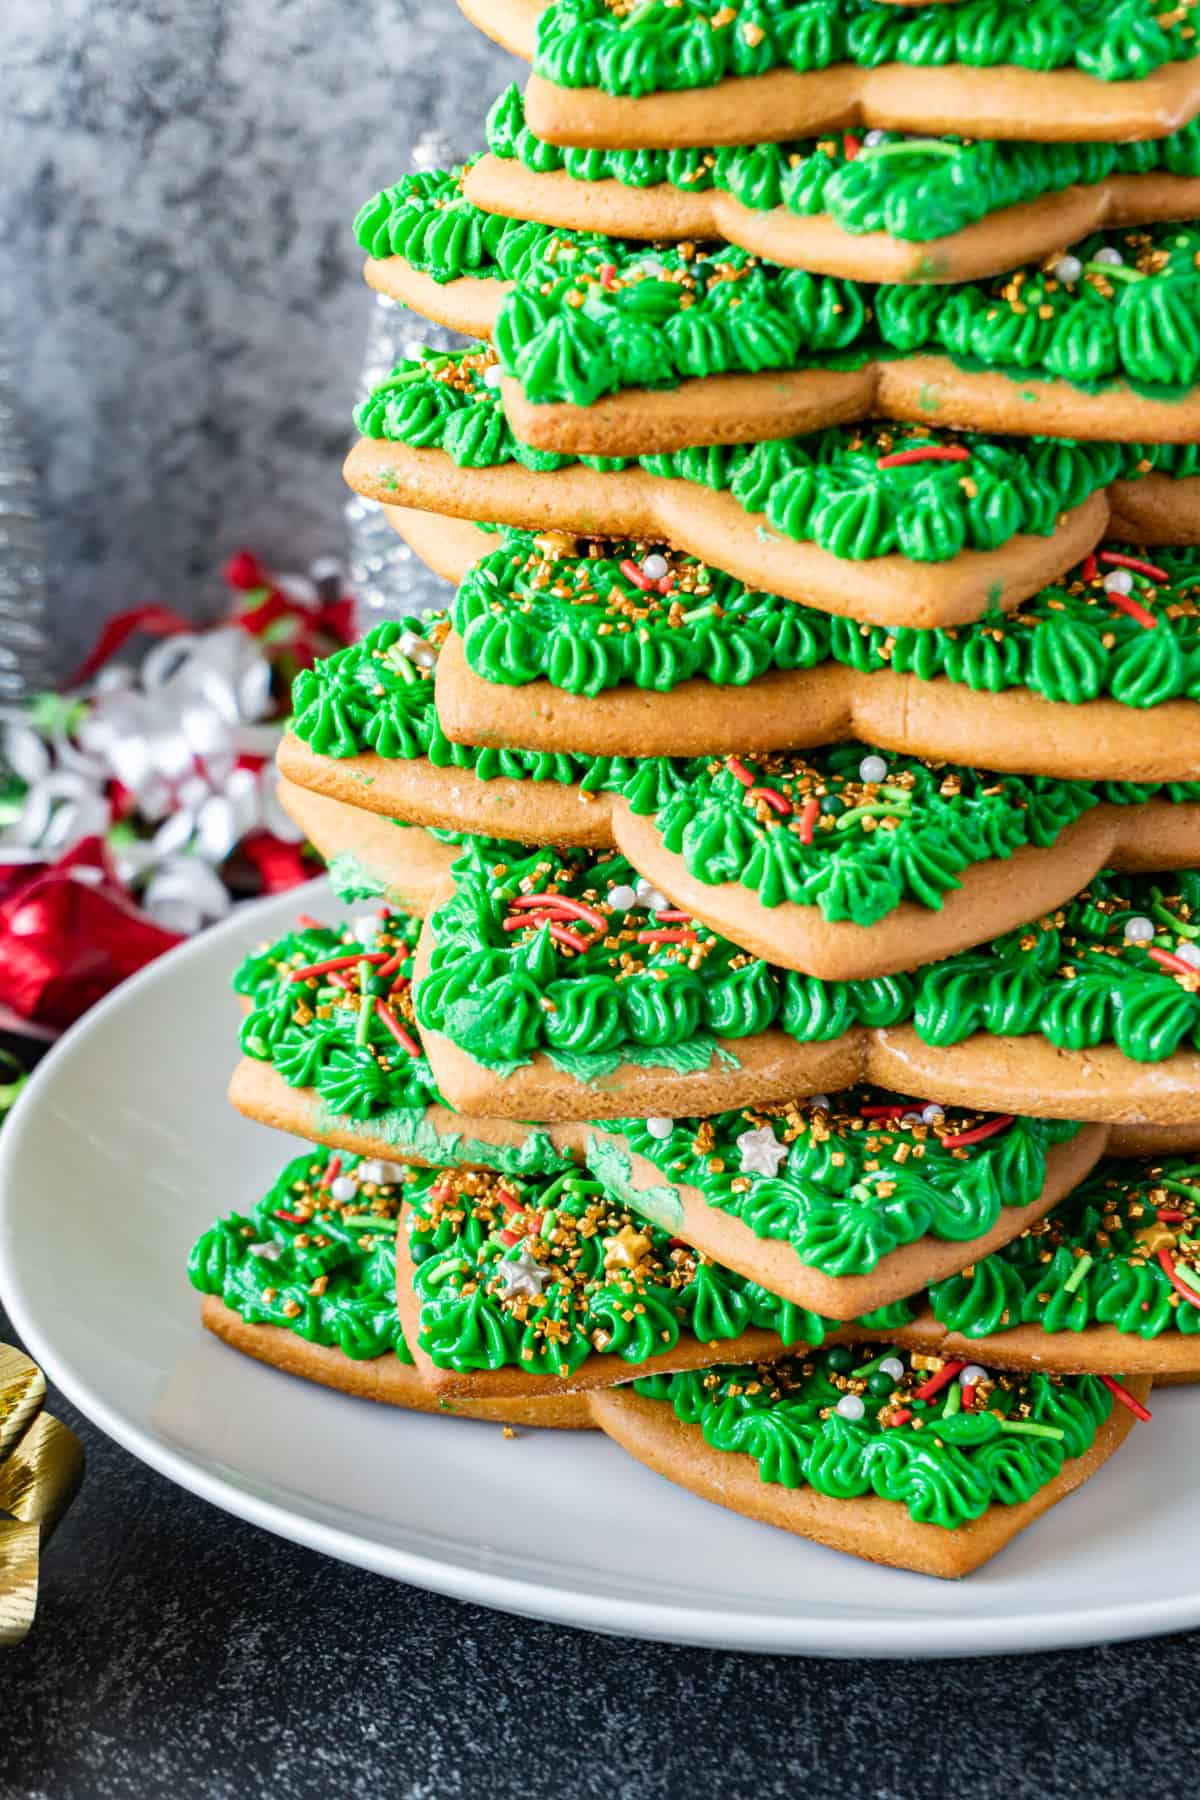
- Step 5: Keep checking and adjusting the stars as you build, making sure they are centered.
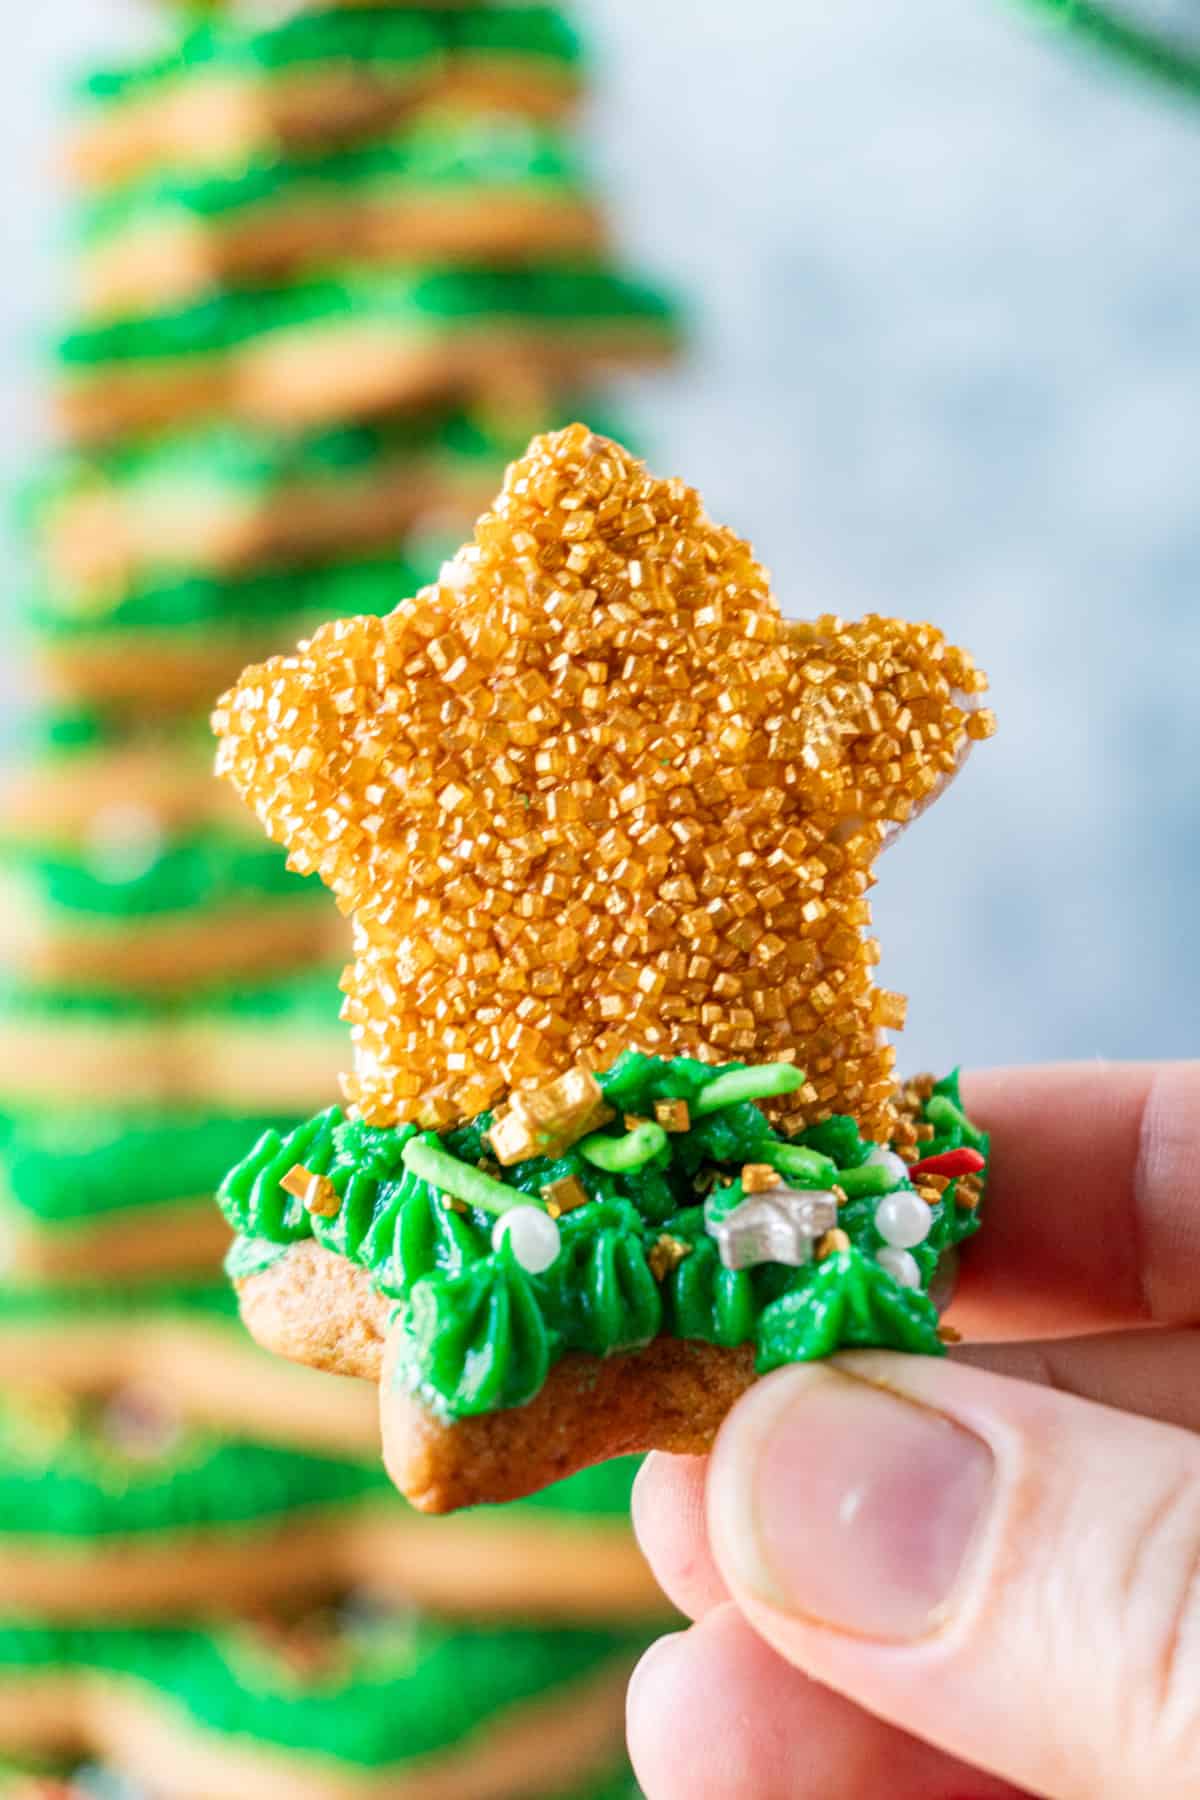
- Step 6: Lastly, affix your gold star to the other small star so it sits upright. Use extra buttercream if needed, then place it on top of the tree.
Expert Tips for the Gingerbread Christmas Tree
Rolling the Dough: I like to roll the dough between two pieces of parchment paper to help prevent sticking, and then I need less flour. Also, I highly recommend a French Rolling Pin/Dowl for the best control of thickness for cookies and pie crust, plus it's very durable.
Cutting the Stars: I like to start with the smaller stars first because then, if need be, you can roll the larger stars out a little thinner if you find yourself a little short on dough.
Large Stars: For larger cookie stars, if you have lots of trouble moving the stars, roll out the dough on parchment paper, then cut the paper around the star and carefully transfer it to the baking sheet.
Keep Decorations Flat: Adding small sprinkles to the cookies is fine. Still, I'd avoid adding large peppermint pieces or chocolate decorations (like crumbled Peppermint Bark) until after you've assembled, then adding them onto each of the points where they will fit.
Topper: Save one of the smallest stars and decorate it with gold sanding sugar, and place it standing up with some leftover frosting on the very top!
Assemble on a Plate: Build your tree where it will be displayed so you don't have to move it later. Each cookie sits on top of another. They aren't attached so that they can be eaten, but it does make it a little precarious because the tree is so tall.
Variations
- Mini Trees: Make small versions for edible gifts or place settings.
- Iced Gingerbread Tree: Use different colored frosting for a fun, festive twist.
- Candy Decor: Add mini M&Ms, candy stars, or silver sanding sugar for sparkle.
- Snowy Tree: Dust with powdered sugar or coconut flakes for a snowy finish
Frequently Asked Questions
Yes! Store it in the fridge for up to 3 days or freeze for up to 2 months.
It will stay fresh for up to a week if stored in an airtight container. Store each cookie flat and assemble right before entertaining.
It is much easier to decorate each cookie then stack them. I found trying to decorate them when they were stacked was messy and cumbersome. Plus, the goal is to have people eat the cookies, so you want each one fully frosted.
I don't recommend moving this when it's assembled at its full height. I would disassemble it into 3-4 sections, then restack them once you move the base.
More Related Recipes
If you like this recipe, make sure to check out my Christmas Wreath Cookies, Christmas Cracker Recipe, Grinch Cookies, Christmas Cheesecake, Christmas Tree Cake Dip, Christmas Oreo Balls, and these fun Christmas Tree Cupcakes!

If you like this recipe, make sure to give it a 5-star review and leave a comment down below!
Also, don't forget to sign up for my newsletter, and make sure to follow along on Facebook, Instagram, and Pinterest!
Video

Gingerbread Christmas Tree
Equipment
Ingredients
- 18 tablespoon granulated white sugar 1 cup + 2 tbsp
- ¾ cup unsalted butter softened*
- 18 tablespoon molasses 1 cup + 2 tbsp
- ¾ cup buttermilk
- 6 cups flour
- 1 tbs ginger powder
- 1 ½ teaspoon baking soda
- 1 teaspoon salt
- ¾ teaspoon baking powder
Buttercream Frosting
- 3 cups butter at room temp
- 15 cups powdered sugar
- 4 tbs vanilla
- 15 tablespoon heavy cream
- Pinch salt
- 1-1 ½ teaspoon Dark Green Food Coloring Gel*
- Extra Powdered Sugar as snow optional
- Christmas Candy or Sprinkles added decoration
Instructions
Note: This recipes is best done over 3 days so plan accordingly.
Day 1: Make the Dough
- Using a stand mixer or a hand mixer, cream the butter and sugar.18 tablespoon granulated white sugar, ¾ cup unsalted butter
- Beat in molasses and buttermilk.18 tablespoon molasses, ¾ cup buttermilk
- Add flour, ginger, baking soda, salt, and baking powder. Stir until fully combined.6 cups flour, 1 tbs ginger powder, 1 ½ teaspoon baking soda, 1 teaspoon salt, ¾ teaspoon baking powder
- Divide the dough into three and wrap each portion with plastic wrap, forming a disc. Refrigerate for 3 hours or overnight.
Day 2: Bake and Decorate
- Preheat oven to 375°F and line a baking sheet with parchment paper.
- Roll dough to ¼-inch thickness for soft cookies. * Dip your cookie cutter in flour, then cut* the dough, cutting two of each size stars, and place on a prepared baking sheet. I find dipping my spatula in flour helps it get under the star. *
- Work in batches since you will be cutting a total of 20 stars. Bake similar sized cookies on the same baking sheet.
- Bake 6-10 minutes for small cookies and 10-15 minutes for large cookies.
- Once baked, transfer cookies to a cooling rack. Allow cookies to cool completely before stacking. While cookies are cooling make your frosting.
- In a stand mixer, whip your butter on medium high speed until the butter is light and fluffy.3 cups butter
- Alternate between adding the powdered sugar 1 cup at a time and the heavy cream 1 tablespoon at a time until all is mixed in. Once mixed, scoop out ~2 tsps of white frosting and set aside (I like to save this to decorate the star topper).15 cups powdered sugar, 15 tablespoon heavy cream
- Then add the vanilla, salt, and green food coloring gel. Start with 1 teaspoon of gel, then add more until it is the color you want.4 tbs vanilla, Pinch salt, 1-1 ½ teaspoon Dark Green Food Coloring Gel*
- Once cookies are cooled, decorate each one by filling a piping bag with frosting and using a star piping tip to create stars and swirls. Add sprinkles after frosting each cookie before the frosting dries.Christmas Candy or Sprinkles
- To decorate the star topper, coat one of the two smallest cookies with the reserved white frosting then press into a small dish of gold sanding sugar or sprinkles.
Day 3: Assembly Of The Tree
- Place a dollop of frosting on the bottom of one of the largest stars, then place on plate or cake stand where it will be displayed. This will help it stay in place.
- Then stack each decorated cookie of same or one size smaller on top of each other, alternating the points. Check the tree as you build it so that you make sure it is straight.
- Once assembled you can either leave as is or lightly dust with powdered sugar, using a fine mesh sieve, to give the look of snow.Extra Powdered Sugar as snow
Notes
- *Butter: To soften butter in the microwave simply heat for 15 second intervals at 30% power until soft.
- *Rolling the Dough: I like to roll the dough between two pieces of parchment paper to help prevent sticking and then I need less flour too.
- *Cutting the stars: I like to start with the smaller stars first because then if need be you can roll the larger stars out a little thinner if you find your self a little short on dough.
- *Large Stars: For larger cookie stars, if you have lots of trouble moving the stars, simply roll out the dough on parchment paper, then cut the paper around the star and carefully transfer to the baking sheet.
- *Color: If you don't have food coloring gel you can use the liquid coloring but you will need 80 drops of green 12 drops of blue, and 2 drops of black to get a dark green color. Also, keep in mind the gel color will darken as it sits.


Lisa says
This is such a fun dessert for Christmas parties!