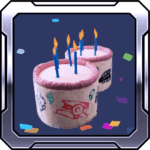
StarCraft Anniversary Cake
Who doesn’t love cake!? This StarCraft Cake is here to celebrate the recent 8 year anniversary of StarCraft II!
Ingredients
For the Cakes*
- You will need to double this recipe
- 1 box white cake mix I used Pillsbury brand
- ½ cup vegetable oil
- 2 tbs vanilla
- ¾ cup sour cream
- ¾ cup heavy cream
- 4 egg whites
For the Best White Butter Cream Frosting
- You will need 1 and a half batches of this frosting you can double this recipe to make it simple
- 1 cup butter cold and cut into chunks
- 5 cups powdered sugar
- 1 tbs vanilla
- 5 tbs heavy cream
- Pinch of salt
- Red and Purple food coloring for the second batch
Extra Items Needed for Decorating
- Cake Decorating Paint Brushes
- Gel Food Coloring
- 2 M Wilton Tip
- Piping Bags
- Blue Candles
- 6 inch cake pans I use 3 at a time
- 1 6 in carboard cake round optional
- 1 8 in carboard cake round optional
- Cake Decorating Turntable optional
- Icing Smoother optional
Instructions
Remember you will need to double the cake recipe and make 1 and half batches of the frosting.
To make the cake:
- Preheat oven to 325°F. Prep your cake rounds by covering the inside of the pans with a light layer of butter and then dusting with flour. I like to use my fingers to make sure the butter gets in all seams.
- Mix together, either by hand or in a stand mixer, the oil, vanilla, sour cream, heavy cream and egg whites. Then mix in the boxed cake mix. Divide the batter between the 3 cake rounds.
- Bake for 25 minutes or until a toothpick inserted comes out clean. Make sure to bake all the cakes on the same oven rack so they bake evenly.
- Let the cakes cool for 5 minutes then flip upside down onto a wire cooling rack and remove the pans. They should come out easily.
- Since you are making two batches of these cakes, mix together the second batch, wash the cake pans, butter and flour them, then bake the second batch.
- Let the cakes cool completely before frosting.
To make the frosting:
- In a stand mixer, whip your butter chunks on medium high speed until the butter is light and fluffy.
- Add in the powdered sugar 1 cup at a time, letting it mix into the butter completely.
- Add in the vanilla, heavy cream, and pinch of salt, allowing the ingredients to incorporate fully. If you are coloring the frosting add the food coloring in at this stage, adding in as much as you need to get the color desired.
- Refrigerate for 15-20 minutes to allow it to thicken up before using to decorate. If the frosting is too thick after refrigerating, it will soften up quickly if at room temperature. So just be patient. If the frosting is too runny, add more powdered sugar to thicken it.
- I recommend making both batches of frosting at the same time. First the white, then the colored. Then refrigerate and pull each out of the fridge when ready to use to frost the cakes.
To decorate the cake:
- On the cake decorating turntable, if using, place an 8 inch cardboard round (if using), then place a 6 inch round (if using) on top of that. Tape the 6 in to the 8 inch round is also advised. If not using any of the above just place on what you are wanting to serve the cake on, but remember it has to fit in the freezer for a little while!
- Add a spoonful of frosting to the center of the 6 inch round (or cake serving plate) and place your bottom cake layer on top, centered on the 6 inch cardboard round.
- Add a nice layer of buttercream on top of the bottom layer, spreading it out to the edges. Place your top layer on top of that.
- Add a crumb coat layer of frosting over the entire cake. A crumb coat layer is a thin layer of frosting that helps keep all the crumbs stuck to the cake and allows you to frost the cake really nicely later on. The crumb coat is not supposed to be pretty!
- Stick your crumb coated cake in the freezer for 10 minutes. While that is in the freezer, frost your next 2 layer cake and stick in that freezer.
- After 10 minutes, remove the cake and frost with the final layer of frosting, making it nice and smooth. I like using an icing scrapper.
- Then using a Wilton 2M piping tip and piping bag, pipe on the colored rim. Then stick the cake back in the freezer for 10 minutes, and frost the 2nd cake.
- Pull the cakes out of the freezer. Then using cake decorating paint brushes (found in the cake decorating isle of a craft store!) and the gel food coloring, paint on the StarCraft Designs.
- Light the candles, slice, and enjoy!
Notes
*This will make six 6 inch cakes. So either frost the extra two cakes and eat them or double wrap them in saran wrap and freeze them for up to a few weeks.
My white cake recipe is inspired and adapted from Baking with Blondie. She has some of the best cakes and cake tips! Check her out if you get the chance!